Under Sink Water Filter – How to Install the Woder 10K Water Filtration System Under the Sink
This video is offering a step by step instructions on how to easily install the Woder 10K Under Sink Water Filter at your home.
The Woder 10K under sink water filter called the 10K because it can filter 10,000 gallons of water, unlike ordinary filters, whose cartridge capacity is good for only 1,000-5,000 gallons. The made-in-the-US Woder 10K lasts at least twice as long – yet costs no more.
The Woder 10K is a class 1 premium quality filter that exceeds industry standards. It removes 99.99 % of contaminants from the water, including chlorine and other volatile organic compounds, lead and other heavy metals. Say goodbye to the bad tasting, bad smelling water you’ve put up with for too long. Say hello to clear, contaminant-free, pure-tasting water.
The Woder 10K under sink water filter comes with everything you need. The easy installation takes just minutes. No plumbing tools or know-how needed.
1. First, turn off the water supply to your sink.
2. Disconnect the existing hose from the cold water supply valve.
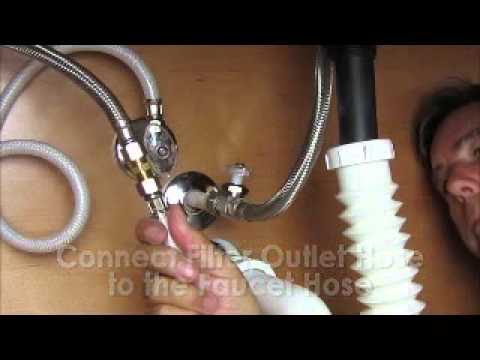
3. Connect the inlet hose of the Woder 10K under sink water filter to the valve, and connect the outlet hose of the filter to the faucet hose.
4. Secure the supplied bracket in a convenient location under the sink. Then snap the filter into the bracket.
5. Turn the cold water supply valve back on.
6. In order to activate the filter, turn on the cold water faucet and let it run for 3 minutes, or until the water runs clear.
That’s it! Easy!
Just click the link above, or go to our website at http://woder.biz/, and order one today. And by the way – all purchases are securely processed and shipped by Amazon so you can buy with confidence. Get your Woder 10k Under Sink Water Filter today.